
The garage wall is laughing at you. Every shelf is overflowing, the drill is buried under three layers of junk, and you spend ten minutes hunting for a tool you'd use in two. If that sounds familiar, you've probably been circling pegboard organization ideas and wondering if the old-school perforated board can actually fix the chaos.
Spoiler: it can, but only when you set it up with intention.
Here's the thing most people miss. Standard pegboard uses 1-inch hole spacing on 1/8-inch or 1/4-inch tempered hardboard, and that spec matters more than you'd think. So before you grab a panel and start hammering, it pays to understand how the layout, the hooks, and the mounting all work together.
Why Pegboard Wins (And Where It Falls Short)
Pegboard earns its keep because it gives you instant visibility and endless flexibility. You hang a hook, drop a tool on it, and you're done. Need to rearrange next month?
Pop the hook out and move it three inches. No patching drywall, no re-screwing brackets, no fighting with a drawer that won't close.
The honest trade-off is weight capacity. Standard 1/8-inch hardboard handles light to medium loads, maybe 10 to 25 pounds per hook depending on the style. Heavier stuff, like a circular saw or a benchtop grinder, demands either a thicker board, a steel panel, or a reinforced mounting system.
If you skip that, you'll watch your board sag and your hooks pull loose.
Aggregate reviews and manufacturer specs tell the same story: most pegboard failures are mounting failures, not hook failures. People attach the board directly to drywall with cheap anchors, then load it up like it's bolted to concrete. That's a recipe for a crashed tool wall.
So pegboard is a great system, but only for the right job. If you're hanging wrenches, hammers, cords, and hand tools, it's hard to beat. If you're storing a 50-pound anvil, rethink your plan.
As of 2026, the best setups pair the right board material with a mounting method that actually supports the load.
First, See It Done Right: What a Great Pegboard Looks Like
Before you buy a single hook, picture the end state. A great pegboard setup isn't just a wall full of tools. It's a thoughtfully zoned workspace where every item has a home and a reason to be there.
In a garage workshop, the best boards group tools by task. Drilling stuff lives in one corner. Wrenches and sockets take the middle.
Sanding and finishing supplies hug the edges. Heavy items sit at or below shoulder height, while rarely used gear drifts up near the top.
In a craft room, the same logic applies but with lighter loads. Yarn spools hang on dowel hooks, ribbon rolls slide over peg rails, and scissors, rulers, and cutting mats get their own dedicated rows. It's color-coded chaos, but organized chaos you can scan in a second.
In an entryway, pegboard turns a blank wall into a landing station. Keys, dog leashes, hats, and reusable bags all get hooks at different heights so kids can reach their stuff and adults don't trip over a backpack pile.
The common thread is obvious when you see it. Every item has a clear visual position, and the board never looks crammed. There's breathing room between tools, and the layout matches how you actually move through the space.
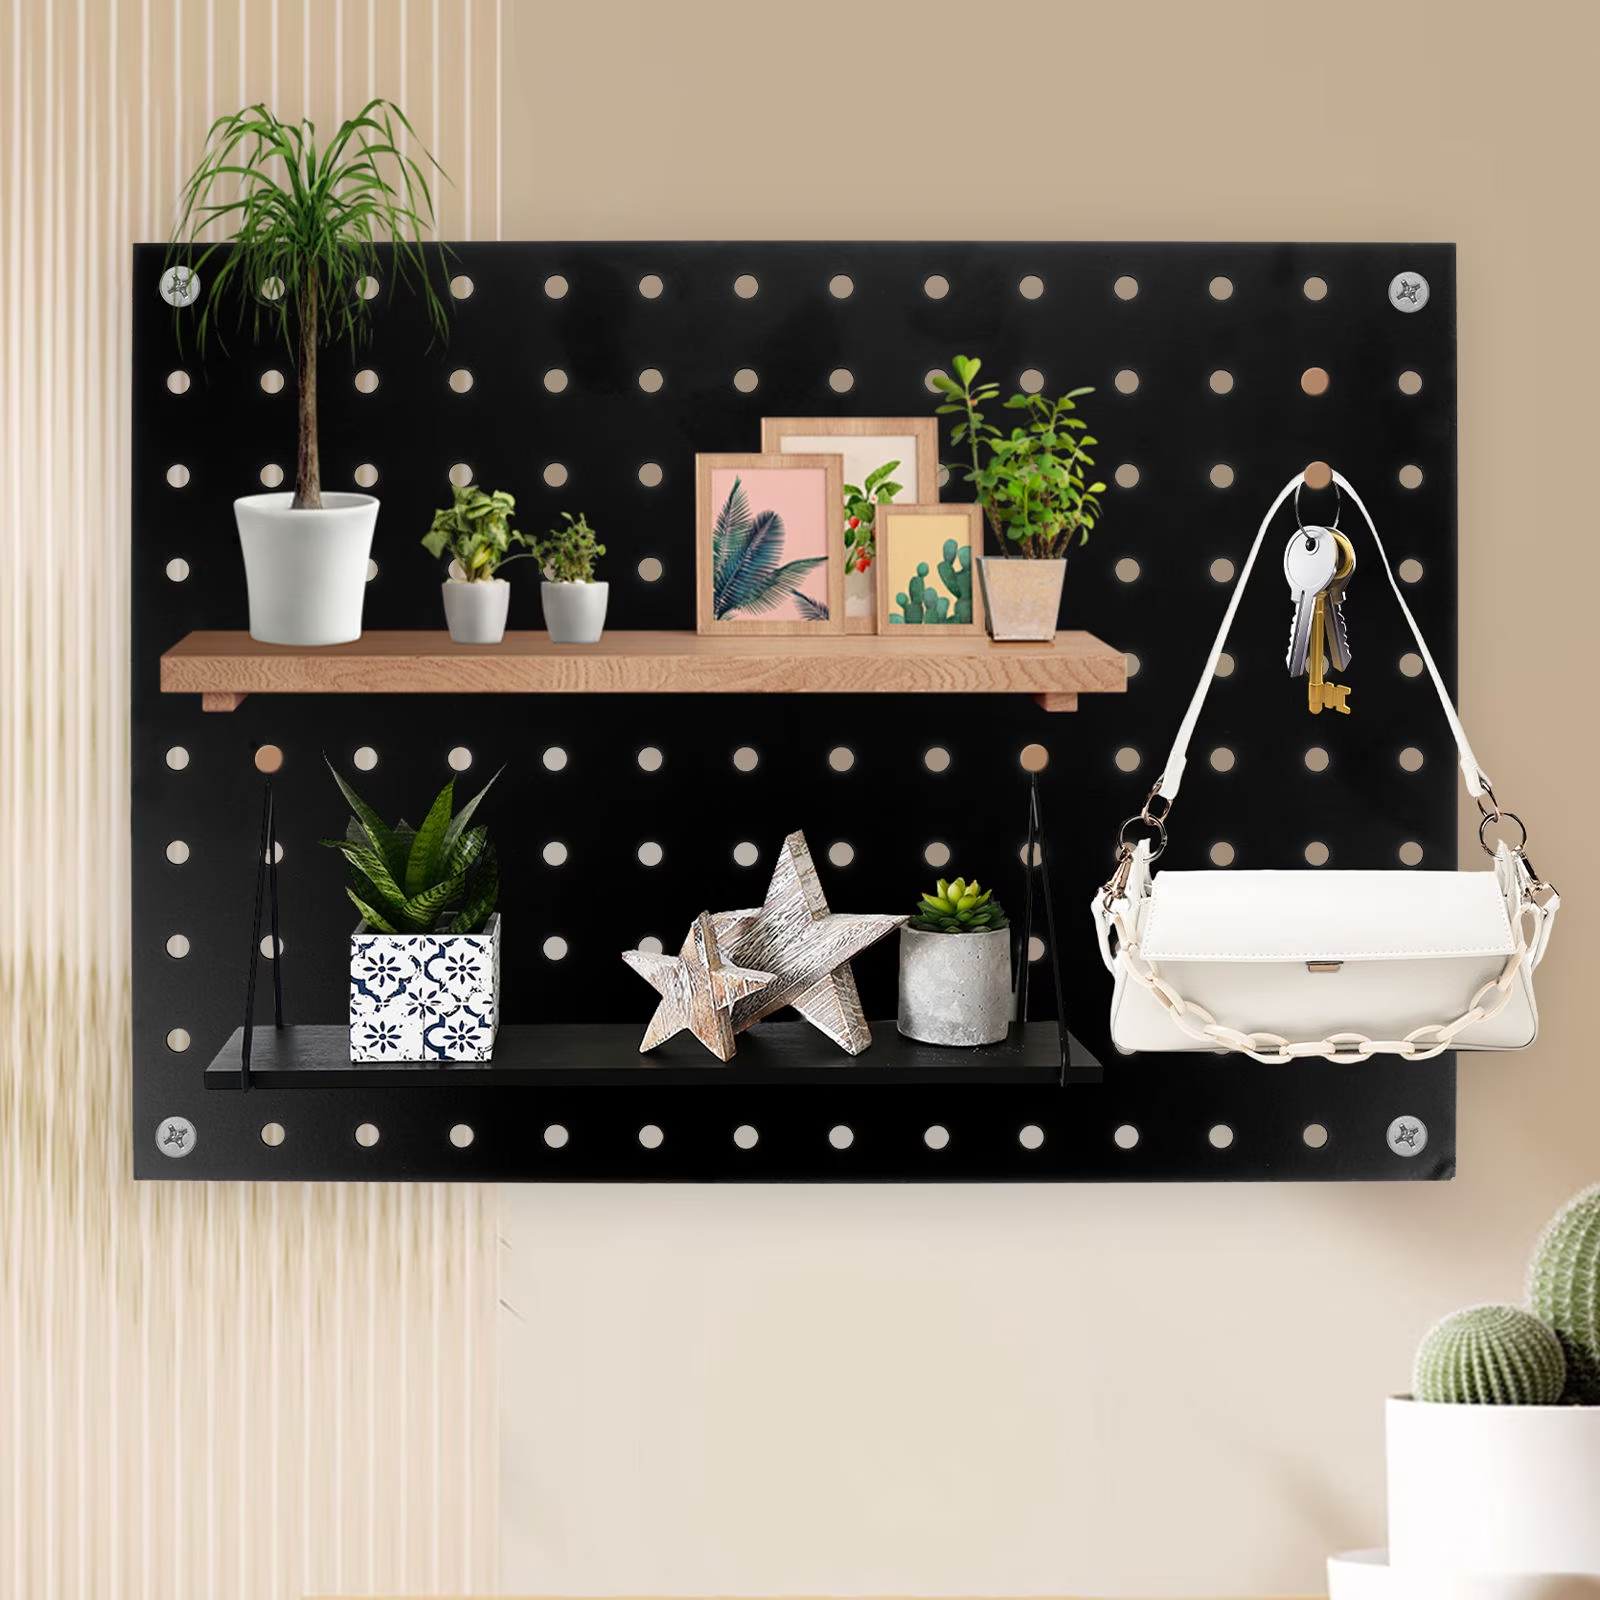
Image source: Web (Bing) / walmart.com (Web image (fair-use with source credit))
How to Plan Your Layout: Measure, Sort, and Zone Like a Pro
The secret to a pegboard that actually works is planning before you drill. Start by dumping everything you want to hang onto a flat surface. All of it.
No exceptions.
Then sort into four piles. Daily use tools. Weekly use tools.
Rarely used tools. And "why do I still own this" tools. Be honest with that last pile.
If you haven't touched it in two years, donate it or sell it.
Now measure your wall space. You need the exact width and height of the area you're covering. Write it down.
Then sketch a rough grid on paper based on your pegboard panels, keeping in mind the standard 1-inch hole spacing.
Here's the zone logic that works in almost every setup.
| Zone | Placement | What Goes There |
|---|---|---|
| Prime zone | Chest to shoulder height | Daily use tools within arm's reach |
| Heavy zone | Belt height and below | Power tools, large hammers, bulky items |
| Storage zone | Above shoulder height | Seasonal gear, spare parts, rarely used tools |
| Edge zone | Outer columns | Long items: measuring tapes, levels, extension cords |
Mark your stud locations on the sketch too. You'll want to anchor your mounting strips to them, and knowing where they are before you start saves major frustration later.
Choosing the Right Pegboard and Hooks for Your Load
Not all pegboard is created equal. The material you pick changes what you can hang, where you can mount it, and how long it lasts.
Tempered hardboard is the classic choice. It's inexpensive, lightweight, and easy to cut with a jigsaw or circular saw. But it warps in humid garages and struggles with heavy loads unless you go with the thicker 1/4-inch board.
Regular untempered hardboard is cheaper, but softer and less durable.
Steel pegboard handles real weight. Powder-coated steel panels support heavy tools, resist moisture, and hold up to years of abuse. They cost more and need stronger wall anchors, but for a serious workshop, they're worth every penny.
PVC or plastic pegboard shrugs off moisture completely. It's ideal for sheds, damp basements, and outdoor spaces. The downside is lower strength, so keep it to lighter loads.
Hooks matter just as much as the board. Wire hooks are the standard, but they bend under heavy tools. Loop hooks and U-hooks hold better because they wrap around the tool handle.
Shelf brackets and small bins add depth, turning flat pegboard into a mini shelving unit.

Image source: Web (Bing) / designingidea.com (Web image (fair-use with source credit))
A good rule of thumb: buy a mixed hook pack first, see what fits your tools, then order more of the styles you actually use. That way you're not stuck with thirty useless clips.
Mounting with Standoff Spacing: The Secret to Hooks That Stay Put
Here's where most pegboard setups go wrong. People screw the panel flat against the wall, then discover the hooks won't seat properly. The hook tips hit the drywall, so they pop out every time you grab a tool.
The fix is simple: stand the board off the wall by at least 3/4 inch. That gap gives the hooks room to click in fully and stay put.
Cut furring strips, use ready-made standoff spacers, or mount the board on a wooden frame. Any of these work. The key is creating that air gap between the pegboard and the wall.
The mounting process takes about an hour for a standard 4×8 panel. Start by finding your studs with a stud finder. Mark their locations on the wall.
Then attach your furring strips horizontally across the studs, making sure they're level.

Image source: Bing (Web (fair-use with source credit))
Screw the pegboard into the furring strips, not into the drywall. Use wood screws long enough to bite into the strips behind the board. Pre-drill through the pegboard holes to avoid cracking the panel.
One more safety note. Before you drill anywhere, check for electrical wiring and plumbing inside the wall. A quick pass with a stud finder that detects live wires can save you from a nasty shock.
Per OSHA safety guidelines for storage areas, keeping your wall organized includes making sure your mounting system doesn't compromise wall integrity or expose you to hidden hazards. If you're unsure about what's behind your wall, consult a licensed electrician first.
Designing Your Layout: Frequency Groups, Outline Shadows, and Symmetry
Now comes the fun part. Arrange your tools on the board in frequency groups. Daily drivers go at eye level.
Weekly tools sit just below or beside them. Seasonal stuff goes higher up, and anything you reach for less than once a month should live near the edges.
Think about how you move. If you're right-handed, put your most-used drills and drivers on the right side of the board. Lefties should flip the layout.
That small detail saves reaching across your body a hundred times a day.
Outline shadows are the secret to keeping it tidy. Trace each tool on a piece of paper, cut it out, and tape it to the pegboard. Or just draw the silhouette directly on the board with a pencil before you paint.
When you grab a tool, the empty outline tells you instantly what's missing.
Symmetry also matters visually. Align like items on the same row. Pair matching wrenches side by side.
Keep screwdrivers grouped by type, not scattered. A board that looks balanced is easier to scan and less likely to turn into junk-on-pegs chaos.
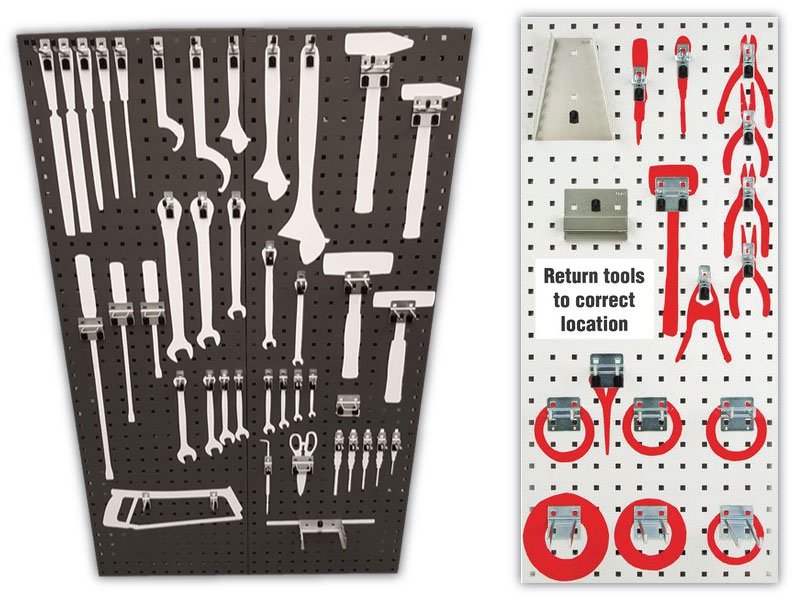
Image source: Bing (Web (fair-use with source credit))
One classic pattern is a diamond layout for small parts. Place bins at the corners and hooks in the middle so your eye naturally travels across the board. Another pattern is a top shelf with bins and hooks hanging below.
That works well in narrow workshops.
Make It Look Good: Styling, Labels, and Smart Add-Ons
Pegboard doesn't have to look industrial. Paint the board with a bold color, like deep blue or forest green, so the tools pop against it. White is fine too, but it shows grime faster.
A satin or semi-gloss finish wipes clean more easily than matte.
Labels keep things organized even when you're in a hurry. Use a label maker or chalk markers directly on the board. Perforated vinyl strips, like the one in the shadow board photo above, let you write with chalk and wipe it off when you rearrange.
Small shelf rails are a game-changer. They bolt into the pegboard holes and give you a ledge for cans, spray bottles, and cleaning supplies. Add a few shallow bins for screws, nails, and bits.
The bins keep small parts from rolling off your workbench.
Magnetic cups are another easy add-on. They clip onto steel pegboard or attach with a small adhesive plate, and they're perfect for holding screws while you work. For hardboard, use a standard cup hook instead.
Keep the lower edge of your pegboard clear of sharp tools if kids share the space. A simple base cabinet or a row of bins on the floor adds safety and gives you a spot for bulkier items.
Common Visual Mistakes and How to Avoid Them
You've seen the worst pegboard walls at garage sales and in rental shops. They share the same failures. Here's what they do wrong and how to dodge it.
Sagging corners. Panels pull away from the wall when the screws only bite into drywall anchors. Fix it by using furring strips on studs and adding extra screws near the corners.
Hook vomit. Too many hooks crammed into a small space makes the board look messy and makes it hard to grab anything. Leave at least one empty hole between most hooks. Reserve tight spacing only for screwdrivers, wrenches, and other thin tools.
Everything above shoulder height. When you hang every tool as high as you can reach, you force yourself to stretch for the things you use daily. Drop the prime zone to chest level and keep the top rows for seasonal gear.
Mismatched hook styles. Mixed bent wire hooks, random cup hooks, and odd clips from old packs look chaotic and hold poorly. Standardize on one or two hook families for a cleaner look and better performance.
No empty space. A fully packed board looks impressive for a day, then becomes visual noise. Leave 15 to 20 percent of your board empty so the tools you do use stand out.
Frequently Asked Questions
How far apart are the holes on a standard pegboard?
Standard perforated hardboard uses 1-inch spacing from hole center to hole center. The holes themselves are usually about 1/8 inch in diameter. Some commercial steel panels use the same pattern, so you can mix accessories from different brands without alignment headaches.
What's the heaviest thing I can hang on a pegboard?
That depends on the board material and hook. In our research, standard 1/8-inch hardboard handles up to 15 to 25 pounds per hook when properly mounted to studs. Steel pegboard can support 50 pounds or more with heavy-duty hooks.
For anything above 30 pounds, use a shelf bracket or a French cleat instead.
How do I get hooks to stop falling out?
Hooks fall out when the board sits flat against the wall, leaving no room for the hook clip to seat. Install furring strips or standoffs behind the board to create a 3/4-inch gap. That simple change locks hooks in place.
Can I hang a pegboard without studs?
Yes, but only for light loads. Use heavy-duty drywall anchors rated for 20 to 30 pounds and spread the weight across many anchors. For a kitchen utensil board or entryway keys, that's fine.
For a workshop, anchor into studs so the board doesn't pull off the wall.
Should I paint pegboard before or after mounting?
Paint it before mounting. That lets you coat the edges and both sides, which helps hardboard resist moisture and keeps the holes from swelling. Sand the surface first, apply a primer, then paint.
If you want outlines for your tools, draw them on after the base coat dries.