
Corner Drawer Organization starts with one frustrating truth: standard rectangular trays rarely fit an angled drawer properly. The best approach is to map the drawer’s shape, divide it into access zones, then choose organizers around what you use. This stops utensils, cookware, and small items from collecting in the deepest corner.
ANSI/KCMA A161.1 sets performance requirements for kitchen cabinets, including drawer operation and load testing. Your drawer’s actual capacity still depends on its runners, construction, and installation. Treat the space as a measured layout rather than a standard drawer.
Corner Drawer Organization Ideas That Maximize Space

Image source: Bing (Web (fair-use with source credit))
Quick Answer
Corner Drawer Organization works best when you map each usable zone first. Keep daily items near the front. Place lighter, occasional-use items toward the rear.
Use adjustable dividers, small bins, or a custom-cut insert.
Why Corner Drawers Need a Visual, Measured Plan
Corner drawers look roomy from above, but their usable footprint can be deceptive. Angled sides, narrow wings, and internal hardware remove more space than you might expect. A top-down sketch shows where items can sit without blocking the drawer.
A corner drawer usually contains three practical storage zones:
- Front-access zone: Best for cutlery, cooking tools, and daily essentials.
- Side wings: Useful for narrow items such as wraps, towels, and measuring tools.
- Rear corner: Better for light, occasional-use items that won’t become buried.
This zoning method follows the same principle used to make compact homes work harder. Frequently used belongings stay visible. Less-used items occupy the harder-to-reach spaces.
Photos help you spot problems that measurements may miss. Take one photo of the empty drawer from directly above. Take another after arranging everything, then compare the two for blocked corners, overlapping utensils, and unused gaps.
As of 2026, many corner drawer systems still use manufacturer-specific geometry. Buying an organizer based only on nominal cabinet width is risky. The internal drawer box might be several inches narrower or have a completely different shape.
Identify Your Corner Drawer Shape and Usable Storage Zones
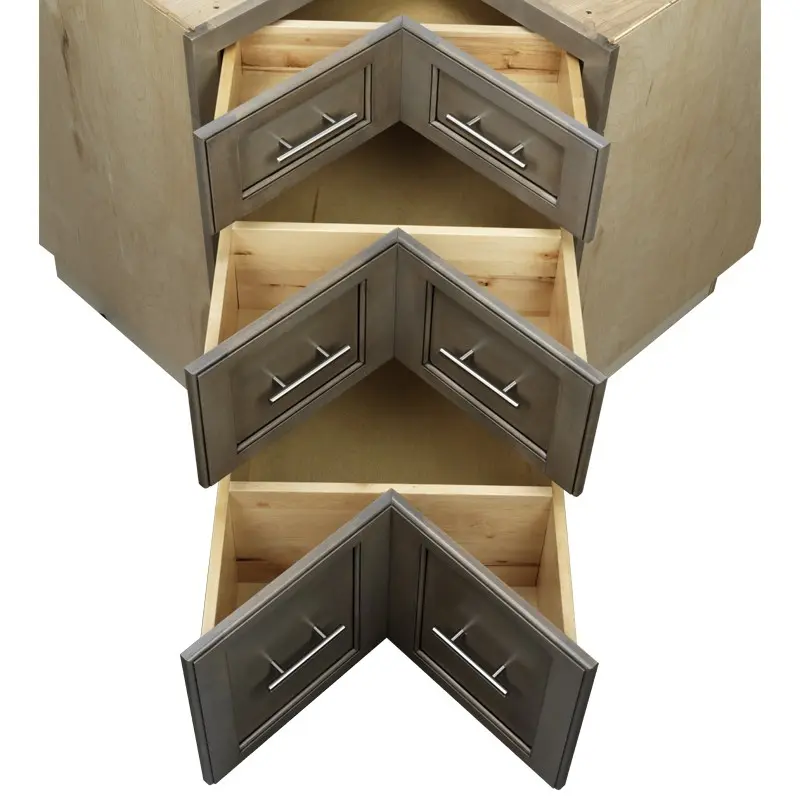
Image source: Bing (Web (fair-use with source credit))
L-Shaped, Diagonal-Front, and Notched Drawer Layouts
An L-shaped drawer has two wings joined around an inside corner. A diagonal-front drawer has an angled face and often narrows toward the rear. A notched drawer is mostly rectangular, with part of its floor removed to clear framing, plumbing, or hardware.
Identify the shape before planning compartments. Each design creates different access and fitting problems.
| Drawer shape | Main challenge | Practical layout |
|---|---|---|
| L-shaped | Narrow wings and an inside corner | Small modules within each wing |
| Diagonal-front | Width changes from front to rear | Adjustable dividers and tapered zones |
| Notched | Interrupted floor area | Separate bins around the obstruction |
| Deep corner drawer | Items stack and disappear | Pegs or upright dividers |
Front-Access, Rear, and Inside-Corner Zones
Stand where you normally open the drawer. Anything you can reach without leaning belongs in the primary zone. This simple test matters more than creating a perfectly symmetrical layout.
Use narrow side wings for long, slim objects that follow the drawer walls. Measuring spoons, rolling pins, foil boxes, and folded towels may fit well there. Don’t place long utensils across the inside bend, where they can catch or block other compartments.
The rear corner works best for lightweight items used occasionally. Avoid loose gadgets that can disappear underneath larger tools. If the drawer can’t hold everything clearly, move secondary supplies into visible kitchen storage.
Measure and Map Your Corner Drawer Before Buying Organizers
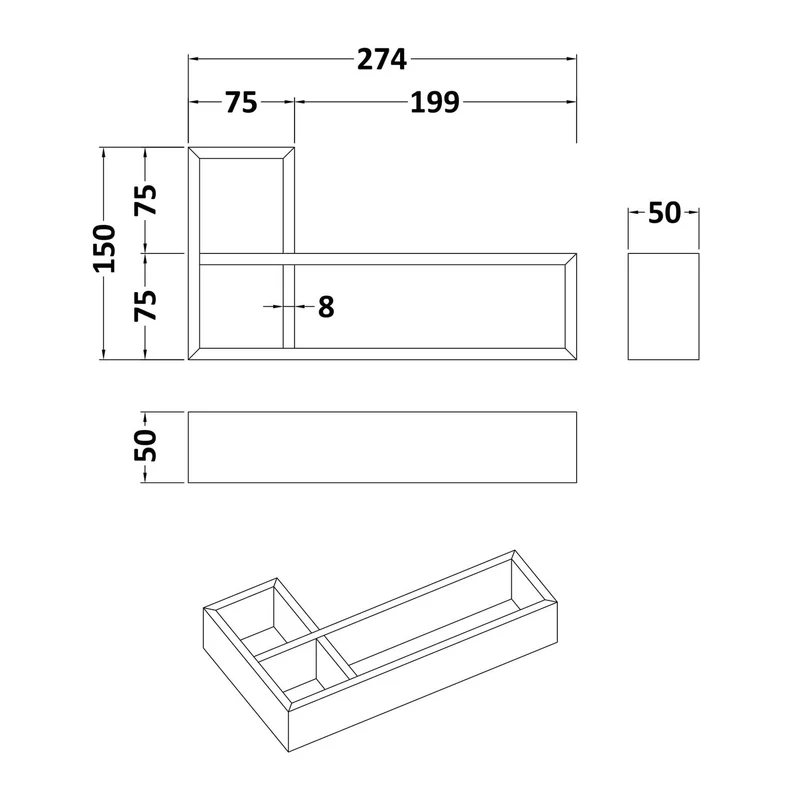
Image source: Bing (Web (fair-use with source credit))
Measure Each Wing, Depth, Height, and Narrowest Point
Empty the drawer and measure the internal drawer box. Don’t use the cabinet face, worktop opening, or advertised cabinet width. Those figures don’t show the space available to an organizer.
Record these dimensions:
- Measure each wing from front to rear.
- Check the width at the front, middle, and back.
- Record the narrowest usable point.
- Measure the clear height beneath the drawer above.
- Mark runners, screws, brackets, and raised edges.
- Check the opening width if bins must pass through a narrower front.
Record measurements in both inches and millimetres when comparing US and European hardware. Choose organizers using the smallest relevant figure. Leave enough finger clearance to lift each bin out for cleaning.
Create a Top-Down Paper or Cardboard Template
Place kraft paper inside the drawer and trace the floor area. Join smaller paper pieces with tape if the box has an awkward shape. Transfer the outline to cardboard when you need a sturdier template.
Mark the front edge, inside corner, hardware, and inaccessible areas. Place your utensils or paper outlines on the template. You’ll see quickly whether handles overlap or compartments waste space.
Temporary templates are especially useful in rented homes. They support the same damage-free approach as removable storage methods. For an engineered system, compare every measurement with the fitting diagrams from the hardware manufacturer.
Choose the Right Organizer for What You’re Storing
Cutlery, Utensils, Spices, and Small Items
Use shallow compartments for cutlery and small cooking tools. Adjustable dividers suit drawer wings with different widths. Small removable bins stop clips, measuring spoons, and bottle openers from migrating into the corner.
Keep spices upright only when the drawer has enough clear height. Labels should face upward so you can identify each container without lifting it. Don’t place glass jars where they can strike the drawer walls.
Pots, Pans, Lids, and Bowls
Deep corner drawers need vertical control. A drawer pegboard can keep bowls, pans, and colanders in separate stacks. Upright dividers hold lids along a straight edge where you can see each size.
Place heavy cookware near strong, well-supported parts of the drawer box. Check the runner documentation before loading cast-iron pans or stoneware. Some manufacturers state a total system capacity, while others specify the load carried by the runners.
The National Kitchen & Bath Association publishes professional kitchen-planning guidance for functional layouts. Reach, clearance, and work zones matter just as much as storage volume.
Custom vs Off-the-Shelf Organizers
Choose modular bins when the drawer’s contents change often. Cut-to-fit trays suit shallow drawers with simple angles. Adjustable dividers are useful when you want to change compartment widths later.
A custom insert makes sense when the drawer has tight curves, narrow wings, or several fixed obstructions. It costs more and offers less flexibility, but it can use irregular floor space efficiently.
For a low-cost setup, combine a non-adhesive nonslip liner with separate containers. This flexible method also works for awkward bedroom storage, where rigid compartments can leave unusable gaps.
Organize Your Corner Drawer Step by Step
Sort Items by Task and Frequency
Empty the drawer completely. Group items by task, such as food preparation, baking, serving, or cleaning. Remove duplicates and relocate anything that doesn’t support the drawer’s main purpose.
Rank each group by how often you use it:
- Daily: Place at the front.
- Weekly: Use the side wings.
- Occasional: Place toward the rear.
- Heavy: Keep low and near supported areas.
- Sharp: Store in a fitted, secured compartment.
This task-based method is similar to creating clear zones in small rooms. The goal isn’t to fill every inch. You should be able to remove one item without disturbing everything around it.
Fit and Secure the Organizers
Place empty organizers on your template first. Dry-fit them inside the drawer without adhesive. Open and close the drawer several times while checking side clearance and usable height.
Add the stored items, then repeat the test. Tall handles can hit the drawer above even when the empty organizer fits. Wide utensils may also shift beyond their compartment during movement.
Use nonslip pads or removable liner to reduce sliding. Avoid permanent adhesive unless the drawer manufacturer permits it. Screws can damage thin drawer bases or interfere with undermount runners.
Balance the Load and Check Operation
Load heavier items gradually and distribute them across both wings. A corner drawer that feels twisted, slow, or uneven may be overloaded or poorly balanced.
Pull the drawer to full extension. Check that nothing scrapes, tips, or catches. Test the soft-close action several times.
If movement worsens, remove weight before adjusting the hardware. Don’t exceed the manufacturer’s load rating. Stop using the drawer if a runner pulls away from the cabinet or the drawer box begins to split.
Common Corner Drawer Layout Mistakes and How to Fix Them
Wasted Angled Space and Poorly Fitting Trays
A large rectangular tray often leaves unusable gaps along angled walls. Replace it with several small bins or adjustable dividers. Use narrow leftover spaces for flat items such as trivets, pan protectors, or folded towels.
Don’t force organizers tightly against every wall. A small clearance gap makes removal easier and prevents rubbing as the drawer moves.
Buried Items and Sliding Contents
Deep drawers become messy when unrelated items share one open space. Add low bins for small tools and vertical pegs for cookware. A nonslip liner reduces movement, but it won’t fix an oversized compartment.
If items still slide, reduce the open area around each group. Don’t pack the space so tightly that you can’t lift anything out.
Excess Weight and Drawer Binding
A drawer that closes slowly, tilts, or rubs may be overloaded. Remove heavy cookware first, then test it again. If the problem remains, inspect visible runner screws and mounting brackets.
Don’t adjust synchronized slides without the manufacturer’s instructions. Incorrect adjustment can worsen racking or stop the soft-close mechanism from engaging.
Unsafe Storage
Store knives in a fitted block, sheath, or secured compartment. Loose blades can shift toward your hand when the drawer opens. Child-resistant locks may be appropriate in family kitchens.
Keep cleaning chemicals out of drawers used for utensils or food-contact items. Allow hot tools to cool before storing them, especially when bins or liners are plastic.
Visual Reference Guide: Best Layout by Drawer Type and Use Case
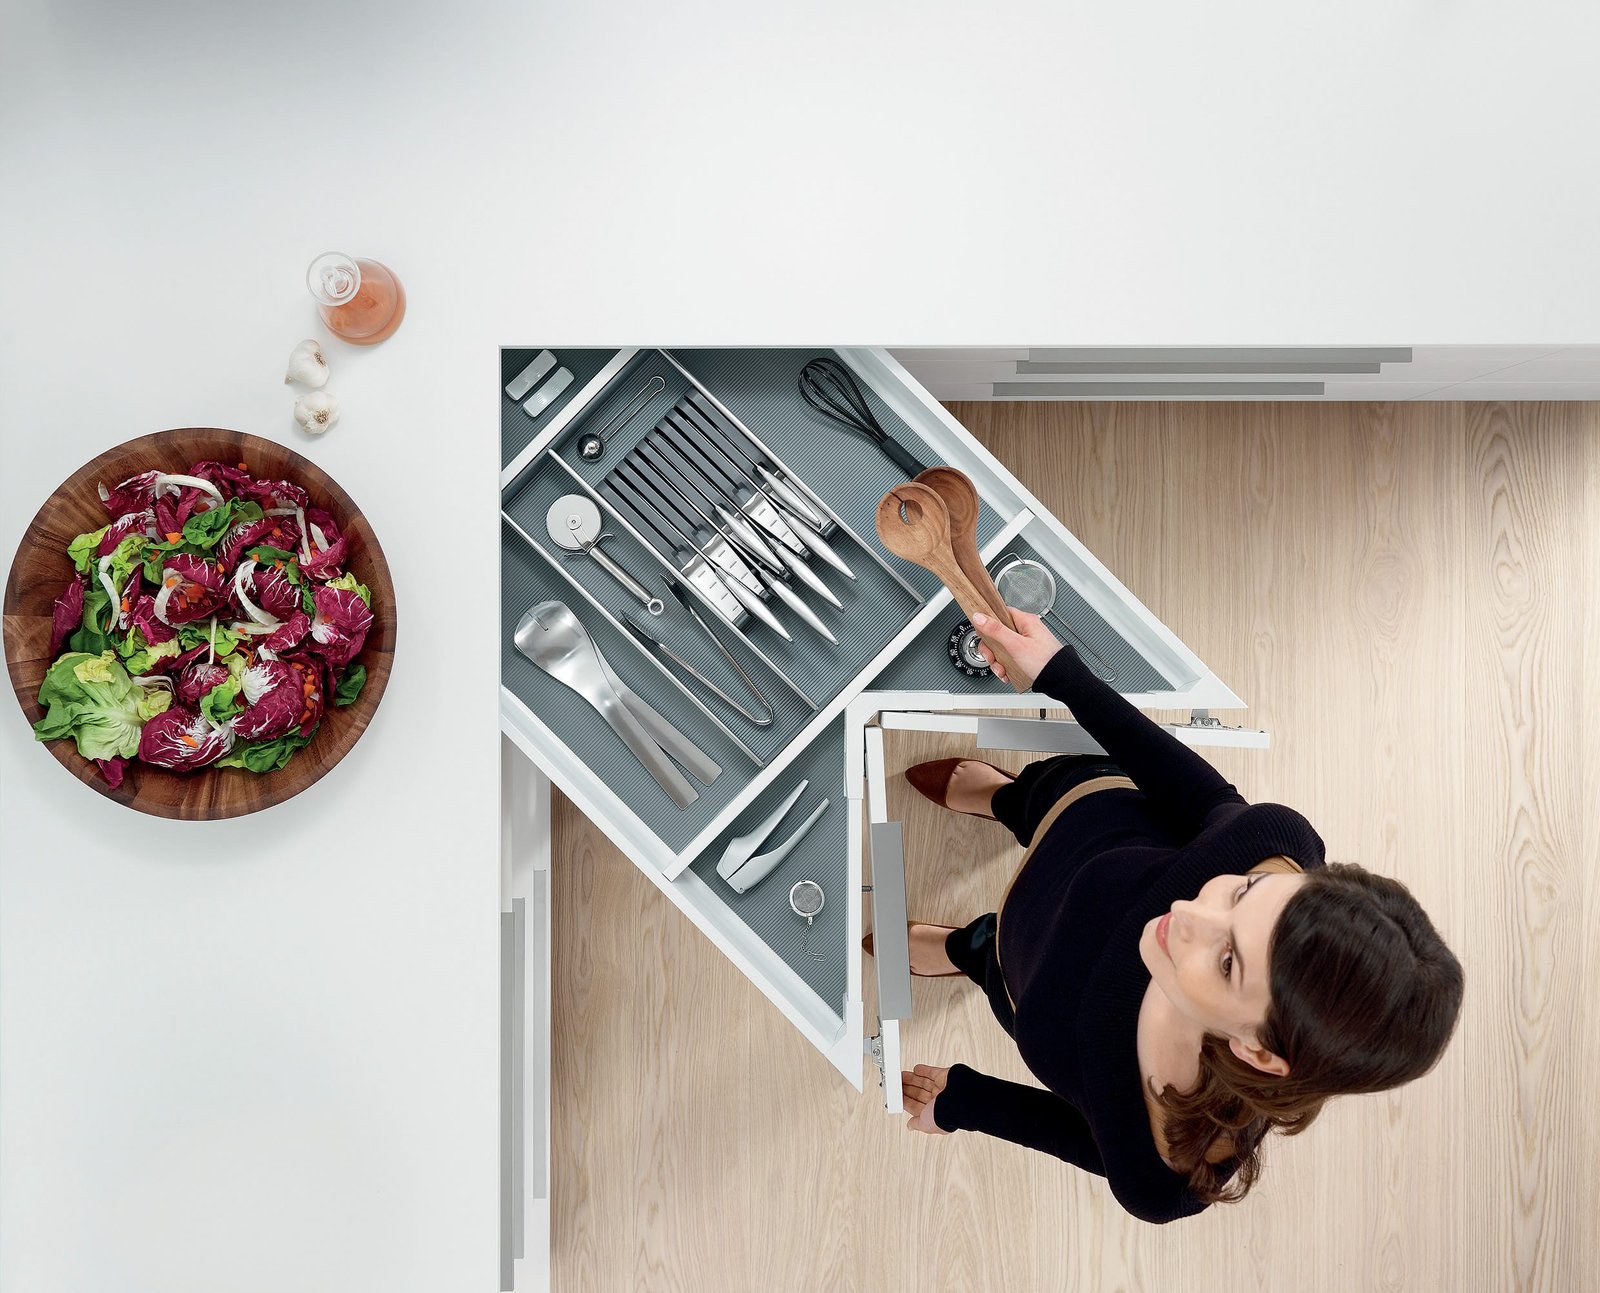
Image source: Bing (Web (fair-use with source credit))
Best Layout for an L-Shaped Utensil Drawer
Picture short compartments running along both wings. Long utensils should sit parallel to the drawer sides rather than crossing the inside corner. Reserve the centre front for tools used during everyday cooking.
Place smaller bins near the bend. This prevents loose items from slipping into the angle while keeping each category visible from above.
Best Layout for a Deep Cookware Drawer
Use adjustable pegs to separate nested pans, bowls, and colanders. Store lids vertically along one straight edge. Keep the heaviest pan near a supported section, provided the runner capacity allows it.
Avoid tall stacks. Two short stacks are usually easier to lift than one deep pile, and they place less strain on lower items.
Best Layout for a Small or Rental Kitchen
Choose removable bins, tension dividers, and non-adhesive liner. These parts can move when your needs change and won’t permanently alter the drawer.
Relocate genuine overflow instead of overfilling the corner. The same approach works in a tight entrance zone, where accessible storage matters more than maximum capacity.
When a Custom Insert Is Worth It
Choose a custom insert when fixed obstacles leave several unusable gaps. It also suits a dedicated cutlery drawer whose contents rarely change.
Modular bins remain better when you expect the categories to evolve. They’re also easier to remove, wash, and reuse elsewhere.
Frequently Asked Questions
What should you store in a corner drawer?
Store items that match the drawer’s depth and access zones. Shallow drawers suit cutlery, utensils, wraps, and baking tools. Deep drawers work better for bowls, pans, and lids.
Keep frequently used items at the front and lighter, occasional-use items toward the rear.
How do you measure an L-shaped drawer for an organizer?
Measure each wing separately at the front, middle, and back. Record the internal depth, clear height, and narrowest width. Mark hardware and raised edges on a paper template.
Use the smallest measurements when checking organizer dimensions, then allow clearance for easy removal.
Can standard rectangular organizers work in corner drawers?
Yes, several small rectangular organizers often work better than one large tray. Arrange them within each straight section and use narrow gaps for flat items. Avoid any tray that bridges the inside angle, blocks a side wing, or prevents the drawer from closing.
How do you stop items from sliding into the corner?
Install a nonslip liner, then contain small objects in correctly sized bins. Adjustable dividers can block the inside corner and prevent utensils from crossing between zones. If items still move, the compartment is probably too large or the drawer is being closed too forcefully.
How much weight can a corner drawer hold?
Capacity varies by drawer box, runners, cabinet construction, and installation. Check the hardware manufacturer’s stated load rating and whether it includes the drawer’s own weight. Remove items if the drawer sags, twists, binds, or stops closing smoothly.
Are corner drawers better than a lazy Susan or blind-corner pull-out?
Corner drawers are often better for visibility because their contents move toward you. A lazy Susan suits tall pantry goods, while a blind-corner pull-out can accommodate larger cookware. The right choice depends on opening clearance, stored items, hardware capacity, and available cabinet space.